FEASTS AND FOTOS

  • Home
  • About
  • Happenings
  • Contact
You are here: Home / Archives for Appetizers

Chicken Tenders with Honey Mustard Sauce

January 28, 2015 by Susan

ChickenTenders3R

The big game is this weekend and that means we get to eat things this Sunday that we normally would not.  Right?  Cheesy dips. Sticky, gooey chicken wings. Let’s do it!

Ok, so if you are not willing to let this Sunday be a huge ‘cheat day’ from your regular eating pattern you can make these chicken tenders.  You might think they would be bad for you, but they are not.  There is no egg and flour or frying involved.  Just some buttermilk, breadcrumbs and cheese.  And they are baked! Even though they are not fried, they still are slightly crunchy on the outside and tender and juicy on the inside.

These chicken tenders would make a wonderful appetizer but, truthfully, we often eat these as a meal. The preparation is quick and easy and if you pair it with a cup or bowl of soup (which we do) you will be satisfied.  Depending on the size of the tenders, of course.  Most of the time the tenders are quite large so eating 4-5 each is usually enough.  I love honey mustard sauce for these (a little more honey tasting than mustard), however, feel free to use your favorite sauce.  We sometimes use BBQ sauce.

Although I am not a huge follower of football during the season, I do love watching the Superbowl.  Mostly for the commercials and the half-time entertainment.  This year I don’t think I’m going to go crazy with all the fried food and cheesy goodness. Instead, I am going to make these.  I’ll feel better about things and I won’t have to log in extra time on the elliptical machine.  And that is always a good thing!

Here’s what you will need to make approximately 15 tenders…

Recipe

1-2 packages chicken tenders

buttermilk

1/2 cup panko, mounded

1/2 cup Italian Seasoned Breadcrumbs, mounded

1/3 cup grated Parmigiano-Reggiano cheese

salt & pepper to taste

Honey Mustard Sauce

3 Tbsp honey

2 Tbsp mustard

1/2 tsp mayo

lemon juice (about 10 drops)

salt & pepper to taste

Method

In a medium bowl add the chicken tenders and enough buttermilk to cover all the chicken.  Allow to marinate in the refrigerator for at least one hour, preferably 4-5 hours.

Preheat oven to 500 degrees.

In a flat, rimmed pan add the panko, seasoned breadcrumbs, cheese, salt & pepper.  Mix with your fingers until ingredients are fully incorporated.

Line a large baking sheet with parchment paper.  Spray parchment paper with cooking spray.

Once the chicken is done marinating, remove from refrigerator.  Take one tender at a time, drain off some of the buttermilk and dredge it in the bread crumb mixture.  I use tongs for this and I usually pat down the breadcrumbs on each side.  Lift out of the breadcrumb mixture and gently shake off any excess. Lay on the baking sheet.  Continue with all the tenders.

Once you have all the tenders lined up drizzle a touch of olive oil over each one. Place in the oven for approximately 15-17 minutes total, flipping over when the bottoms are starting to turn golden (after about 8-10 minutes or so).  I usually don’t cook the 2nd side for as long as the first side.

Meanwhile, prepare the honey mustard sauce by simply adding all ingredients to a small bowl and mixing well.  Set aside.

Allow tenders to cool slightly (they will be piping hot!) and serve with the honey mustard sauce for dipping.

Recipe adapted from Giada De Laurentiis


Chicken Tenders with Honey Mustard Sauce
 
Print
Author: Feasts And Fotos
Ingredients
  • 1-2 packages chicken tenders
  • buttermilk
  • ½ cup panko, mounded
  • ½ cup Italian Seasoned Breadcrumbs, mounded
  • ⅓ cup grated Parmigiano-Reggiano cheese
  • salt & pepper to taste
  • Honey Mustard Sauce
  • 3 Tbsp honey
  • 2 Tbsp mustard
  • ½ tsp mayo
  • lemon juice (about 10 drops)
  • salt & pepper to taste
Method
  1. In a medium bowl add the chicken tenders and enough buttermilk to cover all the chicken. Allow to marinate in the refrigerator for at least one hour, preferably 4-5 hours.
  2. Preheat oven to 500 degrees.
  3. In a flat, rimmed pan add the panko, seasoned breadcrumbs, cheese, salt & pepper. Mix with your fingers until ingredients are fully incorporated.
  4. Line a large baking sheet with parchment paper. Spray parchment paper with cooking spray.
  5. Once the chicken is done marinating, remove from refrigerator. Take one tender at a time, drain off some of the buttermilk and dredge it in the bread crumb mixture. I use tongs for this and I usually pat down the breadcrumbs on each side. Lift out of the breadcrumb mixture and gently shake off any excess. Lay on the baking sheet. Continue with all the tenders.
  6. Once you have all the tenders lined up drizzle a touch of olive oil over each one. Place in the oven for approximately 15-17 minutes total, flipping over when the bottoms are starting to turn golden (after about 8-10 minutes or so). I usually don't cook the 2nd side for as long as the first side.
  7. Meanwhile, prepare the honey mustard sauce by simply adding all ingredients to a small bowl and mixing well. Set aside.
3.2.2802

Filed Under: Appetizers, Main Dishes Tagged With: appetizer, baked, breadcrumbs, chicken, dinner, honey, lunch, mustard, panko, sauce, tenders

Candied Bacon

October 21, 2014 by Susan

Bacon2R

This post comes with a stern warning:  These.  Are.  Addicting.

At first glance, this idea of candied bacon might sound a bit strange to some of you.  Those that shy away from salty and sweet things mixed together might initially reject this (as did my husband).  But once you eat it you will see that the concept of sweetening up salty bacon is rather genius.  And you must try it.

Not only does this recipe sweeten up the bacon, but also adds a smoky element from the chili powder.  It is a wonderful mix of salty, smoky and sweet.  None of the flavors are too bold.

I have made this candied bacon several times and each and every time notice the same exact thing:  we can’t stop eating it. There is something about them (probably the fact that it’s BACON) that pulls me back to grab another one. Again and again.  And the next thing you know, the entire batch is gone.

When serving these I prefer to cut each strip of bacon in half.  I think it makes them easier to eat and makes you feel like you are eating more than you actually are (something I strive for when eating bacon).  Also, they are best served warm, not hot.  Once they cool down a bit the flavor really comes forward.

These strips of candied bacon will be a permanent addition to the menu at every get together I have.  Yes, they are a wonderful finger food to serve with appetizers, however, I’m sure leftovers (but you won’t have any) would be wonderful crumbled in a salad or placed in a sandwich.

Here’s what you will need to make approximately 16 slices of bacon…

Recipe

16 slices thin cut bacon

1/3 cup light brown sugar, tightly packed

1 tsp chili powder (heaping)

1/2 tsp cinnamon (heaping)

Method

Preheat oven to 400 degrees.

Line 2 large baking trays with two layers of tin foil.  Lay a cookie cooling rack in each baking tray.

Trim bacon of any excessive fat (mostly on the ends).

Mix brown sugar, chili powder and cinnamon in a small baking dish or tray with sides.  One at a time, lay bacon slice in spice mixture, pat down and sprinkle spices all over each piece of bacon.  Lay bacon on cooling racks.

Bake for approximately 15 – 17 minutes.  Remove from oven and allow bacon to cool on racks.  During cooling time, move each piece of bacon slightly once (with tongs) so they don’t stick to the rack.


Candied Bacon
 
Print
Author: Feasts And Fotos
Ingredients
  • 16 slices thin cut bacon
  • ⅓ cup light brown sugar, packed
  • 1 tsp chili powder
  • ½ tsp cinnamon
Method
  1. Preheat oven to 400 degrees.
  2. Line 2 large baking trays with two layers of tin foil.  Lay a cookie cooling rack in each baking tray.
  3. Trim bacon of any excessive fat (mostly on the ends).
  4. Mix brown sugar, chili powder and cinnamon in a small baking dish or tray with sides.  One at a time, lay bacon slice in spice mixture, pat down and sprinkle spices all over each piece of bacon.  Lay bacon on cooling racks.
  5. Bake for approximately 15 - 17 minutes.  Remove from oven and allow bacon to cool on racks.  During cooling time, move each piece of bacon slightly once (with tongs) so they don't stick to the rack.
3.2.2802

Filed Under: Appetizers, Snacks Tagged With: appetizer, bacon, candy, caramalized, chili powder, smokey, snacks, sweet

Kale Chips

November 15, 2010 by Susan

Yes, kale chips.  Don’t be scared – they are delicious.  Seriously.

I know these have been around awhile, but I am just now getting on the bandwagon.  I’ve been busy lately.  Ya know…getting married, going on a dreamy honeymoon, redoing my kitchen.  New kitchen!  It is brand new and gorgeous I am no longer embarrassed to have dinner guests over.  So in they come!

These kale chips are an amazing treat to serve with appetizers.  The first thing everyone says upon seeing a huge bowl of these is, not surprisingly, “what is THAT?”  And once I respond “oh, those are kale chips, give them a try” I  see fear on their faces.  Fear.  But then they bravely give them a try and an onslaugh of questions begin.  KALE chips?  How did you do this?  I need the recipe.  How did you get them so crispy?  These are amazing.  How did you ever think of these?  Why haven’t I had these before? 

And the next thing you know the entire bowl is gone.

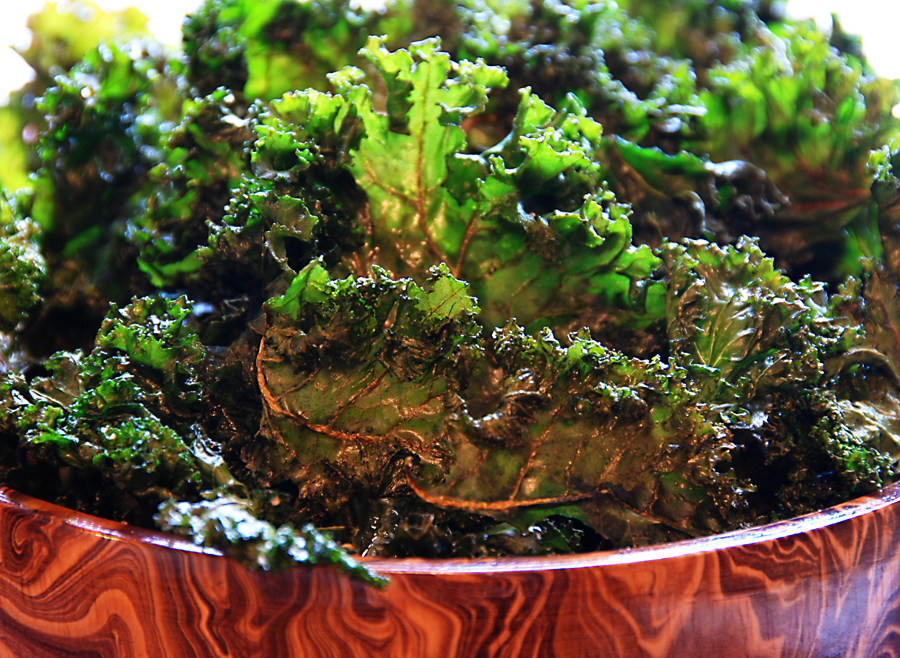
Interestingly enough, once baked these kale chips become very crispy yet extremely delicate.  Do not forcefully jam your hand into the bowl and grab a palmful of them.  They will practically disintegrate.  Instead, grab one at a time, gingerly, with respect.  And when you place it in your mouth you will notice them almost melting onto your tongue.   They are incredibly light, making it easy to eat 75 chips in one sitting.  But it’s kale!

In my personal opinion these chips are genius.  Turn a nutrient-dense dark green leafy vegetable into a crispy snack that you can actually feel zero guilt about eating?  Win-win people.  Not only will these be the topic of conversation at your next dinner party they will give your guest something interesting to look at with each bite.

Each chip is like a piece of art.

Here’s what you will need to make a large bowl of chips…

Recipe

1 large bunch of kale (with the curly tops)

1 tbsp extra virgin olive oil (approximately)

kosher salt

pinch of pepper

(garlic powder, cayenne pepper) optional alternatives

Method

Preheat your oven to 350 degrees.  Line 2 or 3 cookie sheets with parchment paper.

Remove kale leaves from their stems with a knife.  I basically just lay the kale leaf on its side, folding one side of the leaf over the other.  This leaves the stem on one edge.  With a knife simply cut out the stem.

Cut or rip the leaves into various sizes being sure to leave some of the larger leaves whole.  Wash and dry the leaves.

Lay kale chips on your tray.  On each tray you only want enough leaves so they can lay in one single layer. Drizzle with olive oil and sprinkle generously with salt.  I usually then add a small pinch of pepper.  (If you want to jazz them up with some extra spices, now is the time).  With your hands mix all the kale together making sure every leaf is sufficiently coated with olive oil.

Spread the leaves out into that single layer I was talking about, don’t overlap or overcrowd.  Bake in the oven for 11 minutes.

Allow kale to cool slightly then gently arrange in a bowl or on a platter.


Kale Chips
 
Print
Author: Feasts And Fotos
Ingredients
  • 1 large bunch of kale (with the curly tops)
  • 1 tbsp extra virgin olive oil (approximately)
  • kosher salt
  • pinch of pepper
  • (garlic powder, cayenne pepper) optional alternatives
Method
  1. Preheat your oven to 350 degrees.  Line 2 or 3 cookie sheets with parchment paper.
  2. Remove kale leaves from their stems with a knife.  I basically just lay the kale leaf on its side, folding one side of the leaf over the other.  This leaves the stem on one edge.  With a knife simply cut out the stem.
  3. Cut or rip the leaves into various sizes being sure to leave some of the larger leaves whole.  Wash and dry the leaves.
  4. Lay kale chips on your tray.  On each tray you only want enough leaves so they can lay in one single layer. Drizzle with olive oil and sprinkle generously with salt.  I usually then add a small pinch of pepper.  (If you want to jazz them up with some extra spices, now is the time).  With your hands mix all the kale together making sure every leaf is sufficiently coated with olive oil.
  5. Spread the leaves out into that single layer I was talking about, don't overlap or overcrowd.  Bake in the oven for 11 minutes.
3.2.2802

Filed Under: Appetizers, Snacks Tagged With: chips, greens, healthy, kale, snack

Stuffed Potatoes

June 29, 2009 by Susan

StuffedPotatoesResize1NEW

It’s 4th of July week (already?!) and everyone is preparing for BBQ’s.  And praying for good weather, considering it’s rained practically every day this month.  Awful!  Well, keeping positive, here’s a post on delicious stuffed potatoes that are just perfect for a summer BBQ – rain or shine.

I’ve been making these stuffed cuties for a few years now and every time I do people rave about them.  They are delicious and the perfect one or two bite appetizer.  Basically, they are stuffed little red potatoes.  The filling is creamy with a slight sharpness in the background from the blue cheese.  If you don’t love blue cheese, cut back on how much you include.  I usually don’t use the entire 1 cup, I add a little at a time and taste.

When making them, allow for 3-4 halves (2 potatoes) per person, at least.  They will be devoured.

Here’s what you will need to serve approximately 10-12 people…

Recipe 

24 new red potatoes, halved lengthwise

2 teaspoons extra-virgin olive oil

1 1/2 cup sour cream

1 cup crumbled blue cheese (I end up using 3/4 cup usually)

1/2 cup crumbled, cooked bacon, plus more for garnish

1/3 cup (heaping) chopped parsley, plus more for garnish

1/4 red onion, finely chopped, plus more for garnish

Method 

Preheat the oven to 400 degrees.

Toss the potato halves with olive oil and mix well until each half is coated.  Place cut side down on a baking sheet and bake until the skins are crisp and the potatoes are tender, roughly 30 minutes.  The original recipe states 20-25 minutes, but in my oven it takes more like 30-40 minutes.  Allow potatoes to cool.

Gently scoop out the center of each potato half and place in a medium bowl.  Using a small ice cream scoop or melon baller is sometimes helpful for this step.  You do not need to make yourself nuts getting all the potato out of the skin, some can remain inside.  Actually, it’s best if some does remain inside, it will make the potato boats more sturdy.  To the bowl add the sour cream, blue cheese, bacon, parsley and onion.  Stir to mix together.

Fill each potato skin with the sour cream mixture and top each potato with more bacon, onion and parsley.

This recipe is adapted from the Grucci family.


Stuffed Potatoes
 
Print
Author: Feasts And Fotos
Ingredients
  • 24 new red potatoes, halved lengthwise
  • 2 teaspoons extra-virgin olive oil
  • 1½ cup sour cream
  • 1 cup crumbled blue cheese (I end up using ¾ cup usually)
  • ½ cup crumbled, cooked bacon, plus more for garnish
  • ⅓ cup (heaping) chopped parsley, plus more for garnish
  • ¼ red onion, finely chopped, plus more for garnish
Method
  1. Preheat the oven to 400 degrees.
  2. Toss the potato halves with olive oil and mix well until each half is coated.  Place cut side down on a baking sheet and bake until the skins are crisp and the potatoes are tender, roughly 30 minutes.  The original recipe states 20-25 minutes, but in my oven it takes more like 30-40 minutes.  Allow potatoes to cool.
  3. Gently scoop out the center of each potato half and place in a medium bowl.  Using a small ice cream scoop or melon baller is sometimes helpful for this step.  You do not need to make yourself nuts getting all the potato out of the skin, some can remain inside.  Actually, it's best if some does remain inside, it will make the potato boats more sturdy.  To the bowl add the sour cream, blue cheese, bacon, parsley and onion.  Stir to mix together.
  4. Fill each potato skin with the sour cream mixture and top each potato with more bacon, onion and parsley.
3.2.2802

Filed Under: Appetizers, Sides and Sauces Tagged With: appetizer, bacon, bbq, potatoes, side dish, stuffed, summer

Sun-Dried Tomato Jam Crostini

February 24, 2009 by Susan

SundriedCrostiniResize2

I can sit down with a glass of wine and some appetizers and be the happiest woman on the planet.  I view it as sort of an extended happy hour at home.  If you are going to make a light meal out of it, as I love to do, you need to have a few appetizers that are on the substantial side.  One of the more substantial appetizers I always make now is this sun-dried tomato jam crostini.  I absolutely love it.  It’s earthy, tangy and sweet all at the same time.  Perfection.

I adapted this recipe from Giada, making but a few small changes.  The first being I cut back on the vinegar, some people mentioned the original version was a bit too ‘vinegary’.  Also, since I cut back on the vinegar, I also cut back on the sugar.  The last change I made is the addition of the smear of goat cheese on the crostini, I think the extra bit of creamyness really adds to it.  And I love goat cheese!

Aside from this appetizer being absolutely delicious the other aspect I really love is that it can be made ahead of time and kept in the fridge for up to one week.  It’s a huge time saver if you are having a party but also it’s wonderful to keep leftovers so you can treat yourself to a snack during the week.

Here’s what you will need….

Recipe

1 (8-ounce) jar sun-dried tomatoes packed in oil, drained and chopped, oil reserved

1 tablespoon olive oil

1/2 onion, thinly sliced

1 clove garlic, minced

1 tablespoon sugar

1/8 cup red wine vinegar

1 cup water

1/2 cup chicken broth

1 teaspoon chopped fresh thyme leaves

1/2 teaspoon salt

1/2 teaspoon freshly ground black pepper

1 baguette, cut into 3/4-inch slices

5 ounces goat cheese, room temperature

2 teaspoons chopped fresh thyme leaves

Method

Place a medium saucepan over medium heat. Add the chopped sun-dried tomatoes, 1 tablespoon of the reserved sun-dried tomato oil, olive oil, onion, and garlic. Stir and cook until the onions are soft and beginning to brown at the edges, about 5 to 7 minutes. Add the sugar, vinegar, water, chicken broth, thyme, salt, and pepper.

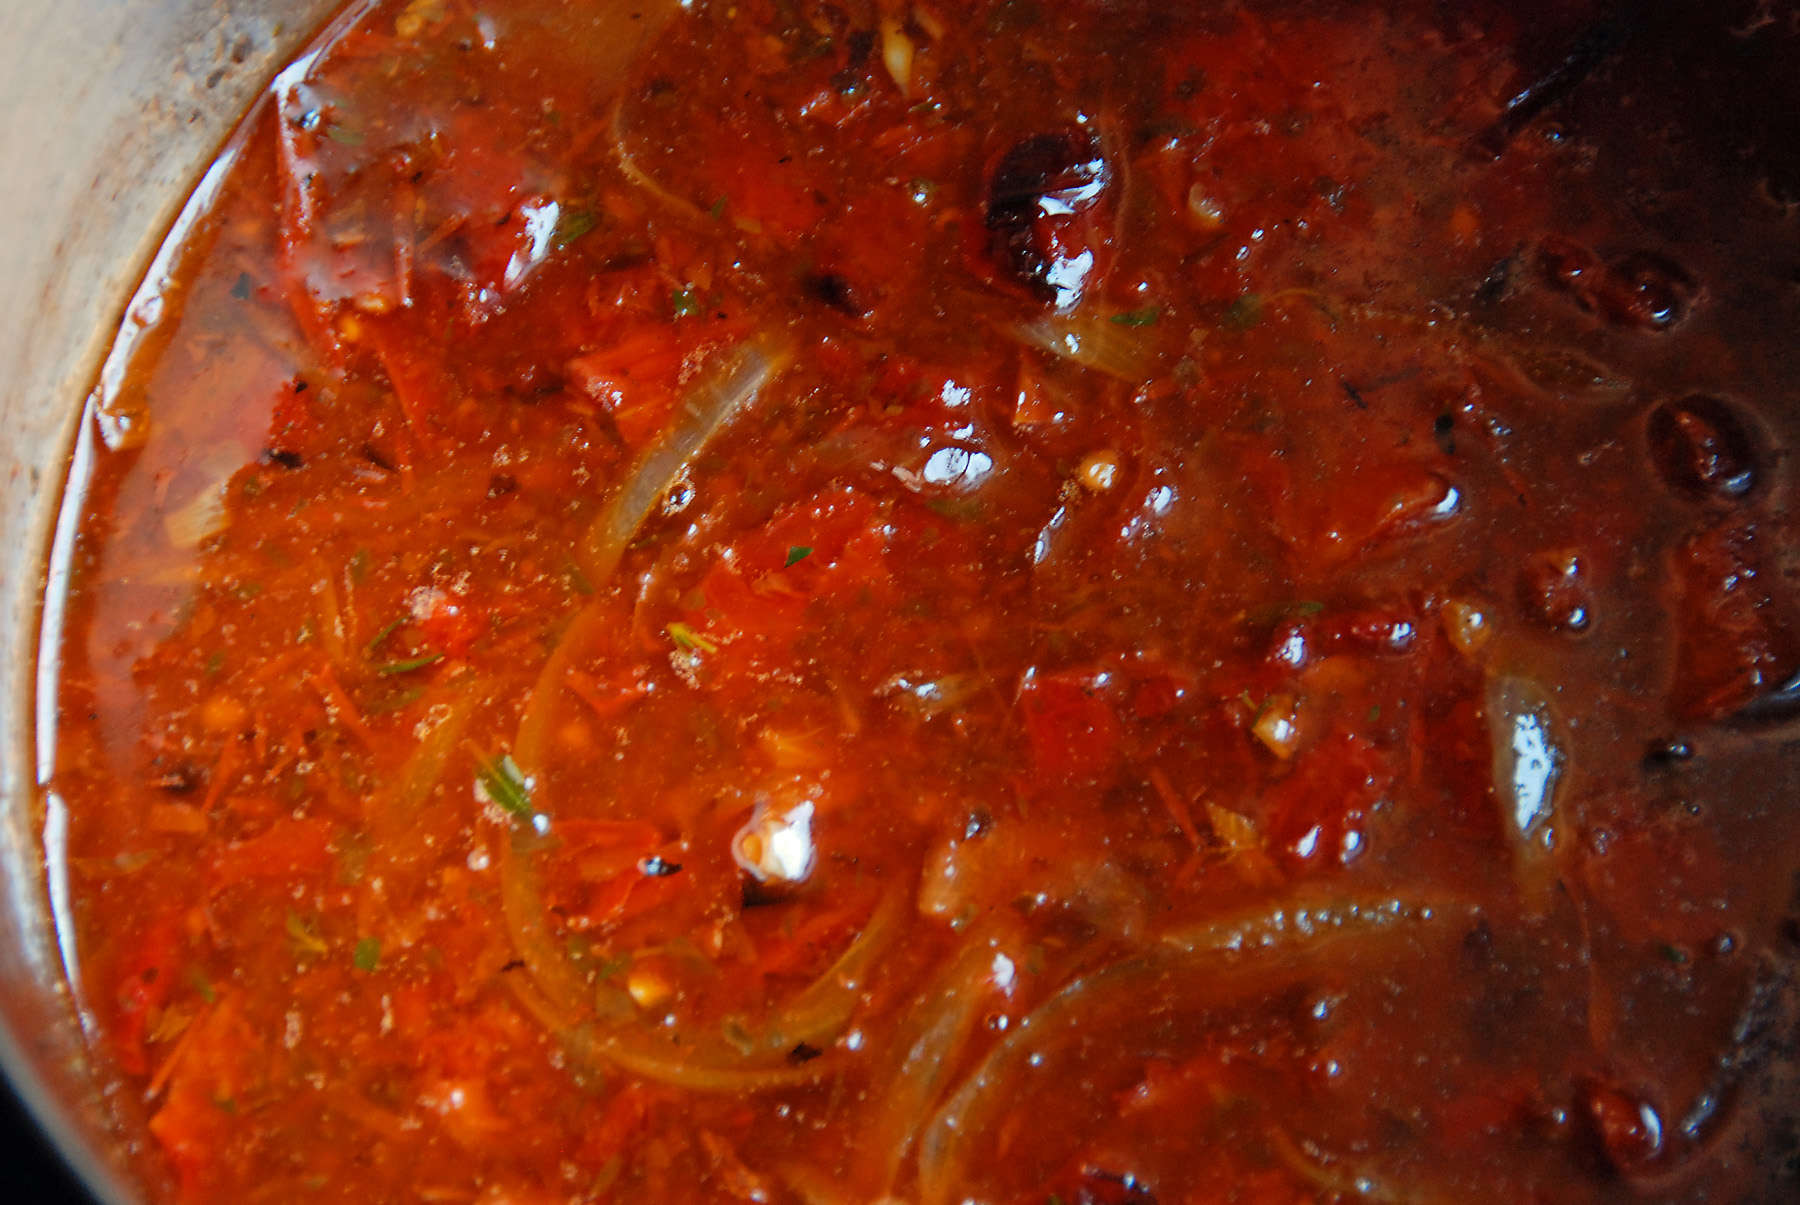
The mixture will look like this….

sundriedliquidresize

Bring the liquid to a boil, reduce the heat, and simmer, covered, for 30 minutes. Remove the cover and continue simmering until most of the liquid is reduced and the mixture is the consistency of jam, about 30-40 more minutes. Remove from the heat and set aside.  (In Giada’s recipe she instructs to allow the jam to reduce for only 10-15 minutes more, which was not enough time at all.  If you keep the heat the same it will take more like 30 minutes to reduce.  You can turn up the heat, however, you will then need to stand around watching the mixture, stirring often.)

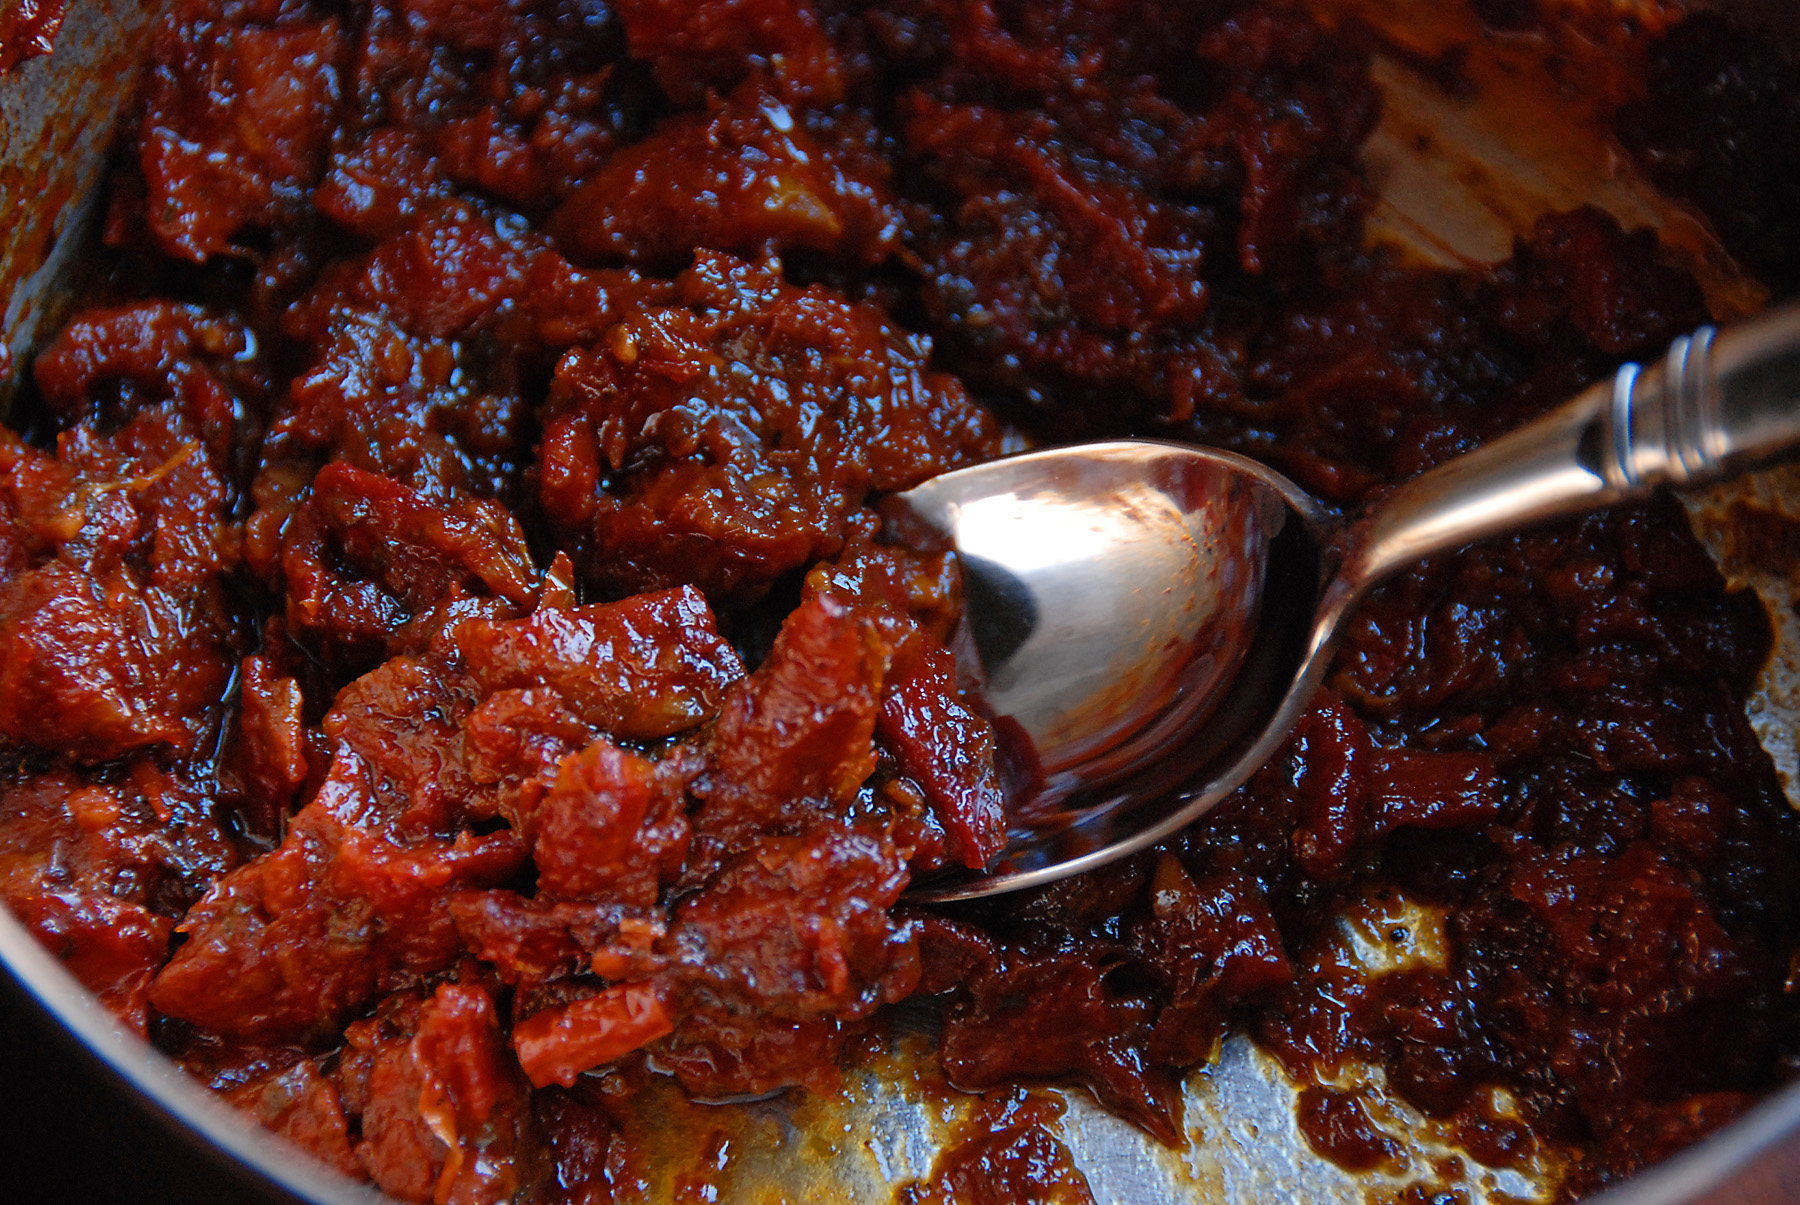
Amazingly enough, that liquid mixture turns into this…

sundriedjamresize

And that is the exact consistency you are looking for.  Jam-like.

As the jam is cooling, mix the chopped thyme into the room temperature goat cheese.  Toast up some crostini and once slightly cooled spread a thin layer of goat cheese on the crostini,  then top with some jam mixture.  Top that with a small dollop of goat cheese.  Enjoy!

Giada’s original recipe can be found here…

http://www.foodnetwork.com/recipes/giada-de-laurentiis/crostini-with-sun-dried-tomato-jam-recipe/index.html


Sun-Dried Tomato Jam Crostini
 
Print
Author: Feasts And Fotos
Ingredients
  • 1 (8-ounce) jar sun-dried tomatoes packed in oil, drained and chopped, oil reserved
  • 1 tablespoon olive oil
  • ½ onion, thinly sliced
  • 1 clove garlic, minced
  • 1 tablespoon sugar
  • ⅛ cup red wine vinegar
  • 1 cup water
  • ½ cup chicken broth
  • 1 teaspoon chopped fresh thyme leaves
  • ½ teaspoon salt
  • ½ teaspoon freshly ground black pepper
  • 1 baguette, cut into ¾-inch slices
  • 5 ounces goat cheese, room temperature
  • 2 teaspoons chopped fresh thyme leaves
Method
  1. Place a medium saucepan over medium heat. Add the chopped sun-dried tomatoes, 1 tablespoon of the reserved sun-dried tomato oil, olive oil, onion, and garlic. Stir and cook until the onions are soft and beginning to brown at the edges, about 5 to 7 minutes. Add the sugar, vinegar, water, chicken broth, thyme, salt, and pepper.
  2. Bring the liquid to a boil, reduce the heat, and simmer, covered, for 30 minutes. Remove the cover and continue simmering until most of the liquid is reduced and the mixture is the consistency of jam, about 30-40 more minutes. Remove from the heat and set aside. (In Giada's recipe she instructs to allow the jam to reduce for only 10-15 minutes more, which was not enough time at all. If you keep the heat the same it will take more like 30 minutes to reduce. You can turn up the heat, however, you will then need to stand around watching the mixture, stirring often.)
  3. As the jam is cooling, mix the chopped thyme into the room temperature goat cheese. Toast up some crostini and once slightly cooled spread a thin layer of goat cheese on the crostini, then top with some jam mixture. Top that with a small dollop of goat cheese.
3.2.2802

Filed Under: Appetizers Tagged With: crostini, goat cheese, jam, sundried tomato

Smoked Salmon and Egg Salad Tartines

January 20, 2009 by Susan

EggSaladSalmonResizeFinalR

These little open faced sandwiches are one of my absolute favorite things.  I have been making them alot, serving them as appetizers when I have a dinner or get together.  Everyone just loves them.  If I ever have any leftovers (which doesn’t happen often) I enjoy them anytime of day – either as a breakfast or a light dinner.  It’s a fantastic spin on the classic egg salad.  I got this recipe from The Barefoot Contessa – I love just about everything she does.  I didn’t make any changes to this recipe basically because it’s perfect as it is.  I do, however, cook my eggs slightly different.  I’ve included my version below, but you can feel free to cook them as you wish.  Just be careful not to over cook them – you don’t want that greenish ring around the yokes!

The combination of flavors as well as textures is amazing.  I love the crunchy bread contrasting with the soft salmon and the almost creaminess of the egg salad.  Amazing!  The addition of the dill takes these over the top.

Here’s what you will need to serve 8 people…

Recipe

12 extra large eggs

1/3 cup mayonnaise

2 tsp whole-grain mustard

1 tbsp minced fresh dill, plus sprigs for garnish

1 tsp salt

1/2 tsp pepper

8 slices of good bread (whole wheat or 7 grain works well)

8 slices of smoked salmon (buy the best you can afford)

Method

Place eggs in a saucepan large enough to accommodate them in a single layer. Fill pan with cold water, covering eggs by 1 inch. Bring water to a boil over medium-high heat. Turn off heat, cover and allow to sit for 11 minutes.  Once cooked, transfer to a bowl of ice water and allow to sit for 1-2 minutes.  Crack and peel eggs.

Place eggs in the bowl of a food processor fitted with a steel blade.  Pulse about 10 times to break them up, do not puree.  Transfer chopped eggs to a bowl and add the mayonnaise, dill, salt & pepper.  Combine lightly with a fork.

Toast the bread.  Lay one slice of salmon on each piece of bread, spoon egg salad onto salmon, garnish with a sprig of dill.  Serve at room temperature.

Original recipe from The Barefoot Contessa can be found here…  http://www.foodnetwork.com/recipes/ina-garten/smoked-salmon-and-egg-salad-tartines-recipe/index.html


Smoked Salmon and Egg Salad Tartines
 
Print
Author: Feasts And Fotos
Ingredients
  • 12 extra large eggs
  • ⅓ cup mayonnaise
  • 2 tsp whole-grain mustard
  • 1 tbsp minced fresh dill, plus sprigs for garnish
  • 1 tsp salt
  • ½ tsp pepper
  • 8 slices of good bread (whole wheat or 7 grain works well)
  • 8 slices of smoked salmon (buy the best you can afford)
Method
  1. Place eggs in a saucepan large enough to accommodate them in a single layer. Fill pan with cold water, covering eggs by 1 inch. Bring water to a boil over medium-high heat. Turn off heat, cover and allow to sit for 11 minutes.  Once cooked, transfer to a bowl of ice water and allow to sit for 1-2 minutes.  Crack and peel eggs.
  2. Place eggs in the bowl of a food processor fitted with a steel blade.  Pulse about 10 times to break them up, do not puree.  Transfer chopped eggs to a bowl and add the mayonnaise, dill, salt & pepper.  Combine lightly with a fork.
  3. Toast the bread.  Lay one slice of salmon on each piece of bread, spoon egg salad onto salmon, garnish with a sprig of dill.  Serve at room temperature.
3.2.2802

Filed Under: Appetizers, Main Dishes, Salads Tagged With: egg, salad, salmon, smoked, tartine

Hello and welcome to Feasts and Fotos!

Archives

Categories

Copyright © 2025 · Foodie Pro Theme by Shay Bocks · Built on the Genesis Framework · Powered by WordPress