FEASTS AND FOTOS

  • Home
  • About
  • Happenings
  • Contact
You are here: Home / Archives for Susan

Frozen Banana Bon Bons

September 1, 2012 by Susan

BonbonsR

I would like to introduce you to my new obsession…frozen banana bites coated in chocolate.  You cannot imagine how good these are.

I meant to post these treats two years ago.  Yup, TWO years ago.  Pathetic.  We usually have these in the summer and it seems the summer flies by in the blink of an eye and I neglect to post this year after year.  And again this summer zipped on by and here I am on Labor Day weekend finally getting around to it.  Oiy.

Anyway, back to the goodies.  Thick slices of banana coated in dark chocolate and then frozen for a few hours.  The banana becomes similar to ice cream, you would think you are eating banana ice cream!  In this photo above (2 years old) I topped each banana with chopped nuts.  Lately I have not been using the nuts, just leaving them a little naked and they are equally outstanding.  I simply don’t have time for that extra step anymore.

If you like banana and you like chocolate and you love having a cold treat on a hot day I guarantee you will absolutely love these.  And since the summer is coming to a close please give these a try soon.  You won’t regret it.

Here’s what you will need…

Recipe

1 Banana, not too ripe (preferably cool from the fridge)

4 oz melted chocolate ( I use 60% or 70% cacao)

chopped nuts (optional)

2 forks

cookie sheet

parchment paper


Method 

Remove banana from fridge, peel and remove any of those stringy things on the sides.  Cut the banana into large chunks (about 1/2 inch thick).  Taking one piece of banana at a time, drop it into the bowl of chocolate and with the forks turn the banana over a few times to coat (don’t prick the banana).  Pick the banana up using the flat side of one fork and gently tap it against the edge of the bowl to remove excess chocolate.  (If you are using the nuts you would put them on the top now).  Lay the banana bite on the cookie sheet.

Continue with all the banana pieces and then put the cookie sheet in the freezer for a few hours.  Once they are frozen you can put them in a ziplock back and keep them stored in the freezer.

Hurry up and make these – the summer’s almost over!

*The banana does end up making the chocolate a bit mealy after the 8th or 9th piece.  If you want to make more just clean out that chocolate and start over with a new 4 oz bar.


Frozen Banana Bon Bons
 
Print
Author: Feasts And Fotos
Ingredients
  • 1 Banana, not too ripe (preferably cool from the fridge)
  • 4 oz melted chocolate ( I use 60% or 70% cacao)
  • chopped nuts (optional)
  • 2 forks
  • cookie sheet
  • parchment paper
Method
  1. Remove banana from fridge, peel and remove any of those stringy things on the sides.  Cut the banana into large chunks (about ½ inch thick).  Taking one piece of banana at a time, drop it into the bowl of chocolate and with the forks turn the banana over a few times to coat (don't prick the banana).  Pick the banana up using the flat side of one fork and gently tap it against the edge of the bowl to remove excess chocolate.  (If you are using the nuts you would put them on the top now).  Lay the banana bite on the cookie sheet.
  2. Continue with all the banana pieces and then put the cookie sheet in the freezer for a few hours.  Once they are frozen you can put them in a ziplock back and keep them stored in the freezer.
3.2.2802

Filed Under: Sweets Tagged With: banana, chocolate, dessert, frozen, healthy, treat

Santa Fe Quinoa

July 13, 2012 by Susan

SouthWestern QuinoaR

Apartment living has its advantages for sure.  No landscaping in the spring.  No shovelling snow in the winter.  The downside is we don’t have a grill, and who doesn’t love grilling in the summer?  Luckily my parents live in suburbia and have a large yard…with a grill!  Every time we visit we buy a big pack of chicken breasts, marinate them and grill them up.  But we don’t eat them there…we bring them home!  And we have cooked chicken in the fridge for the whole week to use in paninis, salads and quinoa dishes.

Last week’s marinade had a southwestern flavor and that is what inspired me to create this quinoa dish.  To be honest, it is great even without chicken, but certainly adding the chicken makes it more hearty and filling and a perfect meal on its own.  In the time it takes you to cook the quinoa you can have all the other ingredients cooked and ready to add.  Super quick, very easy and healthy for you.  Oh, and you won’t believe how delicious it is.

Here’s what you will need to serve 4 (as a side dish)

Recipe

1  1/2 cups quinoa, uncooked

3 cups chicken stock (or a combo of stock and water)

2 medium shallots, small dice

1 red pepper, small dice

1 jalapeno (most of seeds and ribs removed), small dice

2 cloves garlic, minced

1 can black beans, rinsed and drained

1/4 cup frozen corn

1/2 cup fresh cilantro, chopped

salt & pepper

grilled chicken, diced (optional)

Dressing

1 lime, zested and juiced

pinch of cayenne pepper

1/3 cup olive oil

salt & pepper

Method

Prepare quinoa according to directions, using chicken stock as your liquid.  Set aside.

Meanwhile, in a large skillet saute shallots, red pepper, jalapeno and a pinch of salt and pepper in some olive oil over medium heat until they start to soften, about 5 minutes.  Add garlic and saute another minute.  Add frozen corn, again cook for one minute.  Add beans, cooked quinoa and cilantro.  Mix well.  If you are adding grilled chicken add it to the skillet now.

In a bowl combine the lime zest and juice, cayenne and olive oil with a pinch of salt and pepper.  Pour over quinoa mixture and stir well to combine.


Santa Fe Quinoa
 
Print
Author: Feasts And Fotos
Ingredients
  • 1½ cups quinoa, uncooked
  • 3 cups chicken stock (or a combo of stock and water)
  • 2 medium shallots, small dice
  • 1 red pepper, small dice
  • 1 jalapeno (most of seeds and ribs removed), small dice
  • 2 cloves garlic, minced
  • 1 can black beans, rinsed and drained
  • ¼ cup frozen corn
  • ½ cup fresh cilantro, chopped
  • salt & pepper
  • grilled chicken, diced (optional)
  • Dressing
  • 1 lime, zested and juiced
  • pinch of cayenne pepper
  • ⅓ cup olive oil
  • salt & pepper
Method
  1. Prepare quinoa according to directions, using chicken stock as your liquid. Set aside.
  2. Meanwhile, in a large skillet saute shallots, red pepper, jalapeno and a pinch of salt and pepper in some olive oil over medium heat until they start to soften, about 5 minutes. Add garlic and saute another minute. Add frozen corn, again cook for one minute. Add beans, cooked quinoa and cilantro. Mix well. If you are adding grilled chicken add it to the skillet now.
  3. In a bowl combine the lime zest and juice, cayenne and olive oil with a pinch of salt and pepper. Pour over quinoa mixture and stir well to combine.
3.2.2802

Filed Under: Rice and Grains Tagged With: gluten free, healthy, lunch, Quinoa, side dish

Mushroom and Leek Pizza

June 11, 2012 by Susan

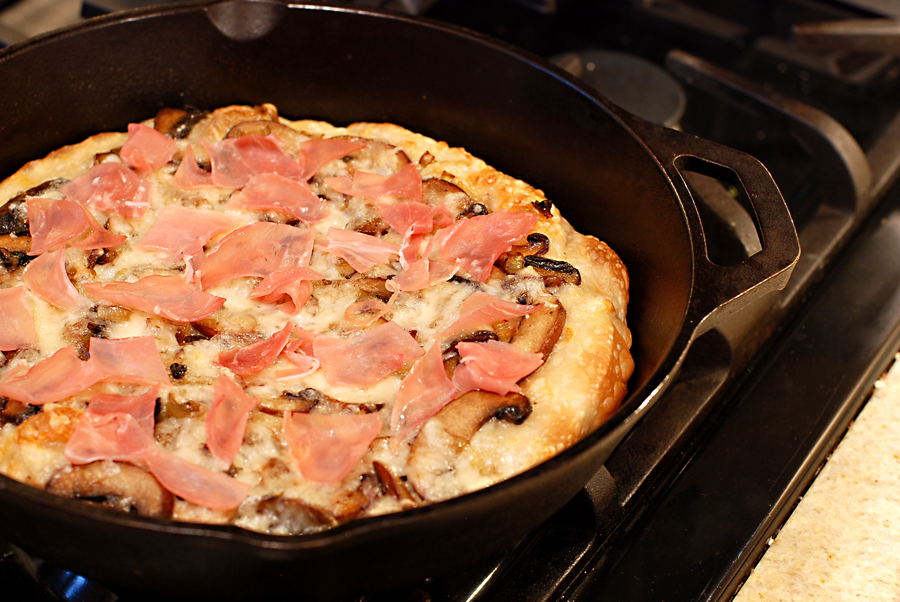
Looks as if I am on a cast iron skillet kick, doesn’t it?  As it turns out this pizza and the cornbread (in my previous post) are the only two things I make in my cast iron skillet.  And to be honest, I would’ve never thought to make either in a cast iron skillet – thank you Martha Stewart for opening my eyes!  This technique for making a pizza is brilliant, you don’t have to deal with pizza stones or anything else, just a skillet.

This pizza is delicious. The mushroom and leek combination is wonderful, the fontina cheese melts beautifully and the prosciutto, which doesn’t even actually cook, takes it over the top with a slightly salty punch.  Heaven.  And you know what else is heaven?  I bought the pizza dough.  I could certainly make it myself, but why would I?  I have an infant that occupies demands 98% of my time and the pizza place around the corner happily sells me the dough they have made to perfection.

This pizza is leagues above any frozen pizza out there and cooks in almost the same amount of time.  Why wouldn’t you make this?

Here’s what you will need to make one small pizza…

Recipe

2 tablespoons unsalted butter

1 large leek, white and pale green parts only, sliced

1 package crimini mushrooms, cleaned and sliced

1 teaspoon extra virgin olive oil

2 cups fontina cheese, grated

3-4 thin slices prosciutto, chopped into 1 inch pieces

1 small pizza dough (I get it drizzled with olive oil)

*10 inch cast iron skillet

Method

Preheat the oven to 500 degrees.

First get started on the leek.  Using the white and pale green parts only, slice the leek down the center lengthwise, then slice crosswise into 1/2 moons.  Place in a deep bowl and rinse under cold water once or twice, running your fingers through the leeks, breaking them apart.  Fill up the bowl with cold water and let the leeks sit for a few minutes.  Any remaining grit will sink to the bottom of the bowl.

Carefully scoop out the leeks, being sure to not disturb the water below.  Lay on a kitchen towel to dry a bit.

While the leeks are sitting in the water, clean and slice your mushrooms.

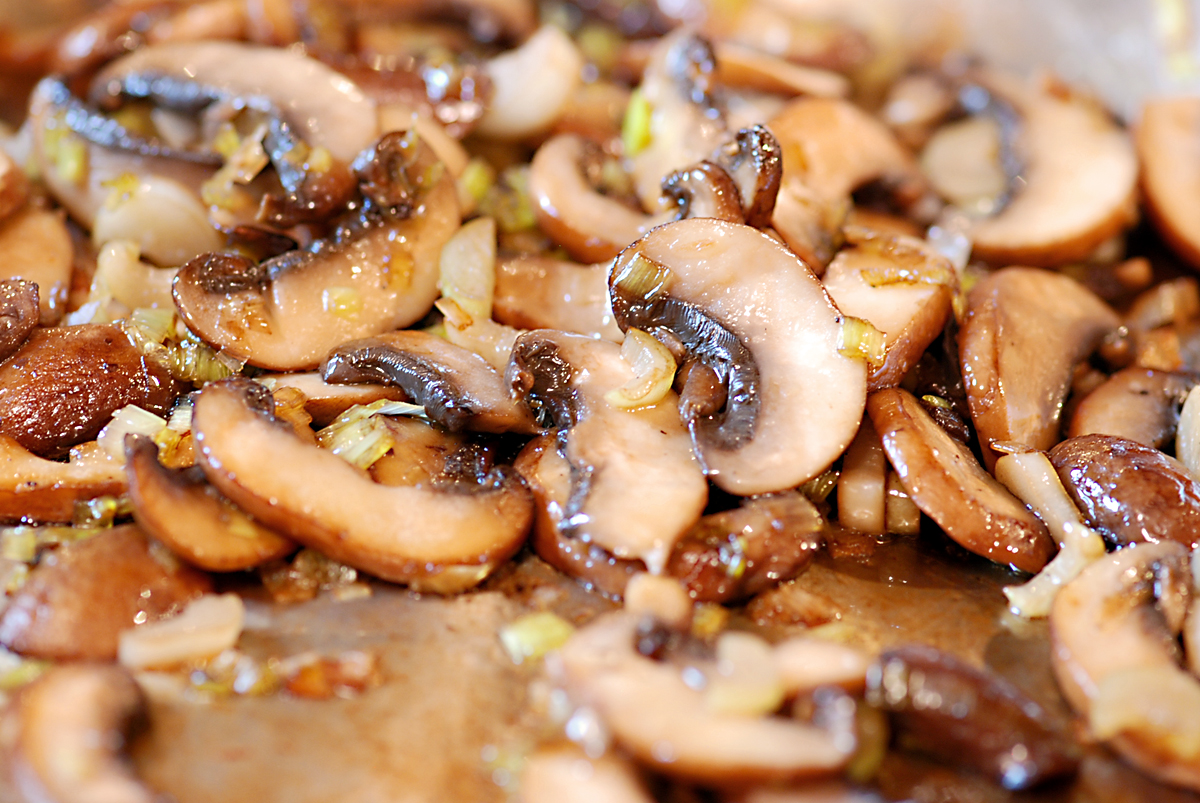
In a medium skillet (not the cast iron skillet) melt 1 tablespoon of butter over medium heat.  Add the leeks and cook until softened, about 4 minutes.  Add sliced mushrooms to the pan as well as the remaining tablespoon of butter.  Saute until the mushrooms soften, 4-5 minutes.  Allow to cool slightly.  While the mushrooms are cooking, shred the fontina cheese.  (It helps to put the cheese in the freezer for about 20 minutes before shredding).
I love mushrooms.


Pour 1 tablespoon of oil in the middle of the cast iron skillet and spread it all around, coating the entire bottom as well as a portion of the sides.  (I use a pastry brush for this).  Lay the pizza dough in the skillet and flatten and stretch out with your fingertips.  The edges of the dough should cover the entire bottom of the skillet.

Turn the flame on to medium under the cast iron skillet.   Lay about 1 cup of fontina cheese on the pizza dough.  Then top the cheese with the mushroom mixture (I usually have some leftover, good for throwing into a frittata or for snacking).  Finally, add the rest of the fontina on top of the mushrooms.  Allow the pizza to cook on the stove top for approximately 4-5 minutes.  You will notice the bottom starting to brown.

Now transfer the skillet into the oven.  Allow to cook for about 10 minutes, being careful not to burn the pizza.  Take the skillet out of the oven and scatter the prosciutto pieces over the top of the pizza.  Slice and serve!

Filed Under: Main Dishes Tagged With: cast iron skillet, fontina cheese, leek, mushroom, pizza, prosciutto

Skillet Cornbread

April 27, 2012 by Susan

SkilletCornbreadR

Break out that cast iron skillet!  You won’t believe how delicious and easy this cornbread is.

I always, always make this cornbread when I serve chicken enchiladas.  The enchiladas are delicious as well, so much so that I can never get a photo of them because they are eaten immediately.  Next time, I keep telling myself. And the years have just flown by.  Oh well, back to the cornbread…

Outstanding.  Ever so slightly crispy on the outside and light and moist on the inside.  The scallions give a nice mild oniony flavor and the cheddar adds a richness.  If you are into a little spice, go ahead and throw in some jalapeno.  We like a little spice around here.

If you have any leftovers you will be happy to know that it holds up really well in the fridge.  I just wrap it in plastic and reheat in a toaster oven, or if I’m in a rush, a quick reheat in the microwave.  (Better in the toaster).  I’ve even been known to eat a big slice for breakfast…yum.

Here’s what you need to make one 10 inch cornbread…

Recipe

1 1/4 cups yellow cornmeal

1 1/4 cups all purpose flour

2 tbsp sugar

1 1/2 tsp baking powder

1/2 tsp baking soda

1 1/4 tsp salt

1 large egg

1 3/4 cups buttermilk

2 tbsp butter

1/2 cup cheddar cheese, shredded

1/3 cup scallions, chopped

1 jalapeno (optional)

Method

Preheat oven to 425.

Whisk together cornmeal, flour, sugar, baking powder, baking soda and salt in a large bowl.  Set aside.  Whisk together egg and buttermilk, stir into flour mixture.  Add cheese and scallions, and jalapeno if you are going for a little kick.

Melt butter in a 10 inch cast iron skillet.  Swirl to coat bottom and sides.  Pour batter into skillet and smooth out mixture slightly.  Bake in the oven for approximately 20-25 minutes.

Fresh out of the oven and gorgeous!


Skillet Cornbread
 
Print
Author: Feasts And Fotos
Ingredients
  • 1 1/4 cups yellow cornmeal
  • 1 1/4 cups all purpose flour
  • 2 tbsp sugar
  • 1 1/2 tsp baking powder
  • ½ tsp baking soda
  • 1 1/4 tsp salt
  • 1 large egg
  • 1 3/4 cups buttermilk
  • 2 tbsp butter
  • ½ cup cheddar cheese, shredded
  • ⅓ cup scallions, chopped
  • 1 jalapeno (optional)
Method
  1. Preheat oven to 425.
  2. Whisk together cornmeal, flour, sugar, baking powder, baking soda and salt in a large bowl.  Set aside.  Whisk together egg and buttermilk, stir into flour mixture.  Add cheese and scallions, and jalapeno if you are going for a little kick.
  3. Melt butter in a 10 inch cast iron skillet.  Swirl to coat bottom and sides.  Pour batter into skillet and smooth out mixture slightly.  Bake in the oven for approximately 20-25 minutes.
3.2.2802

Filed Under: Sides and Sauces

Coco-Nana Bread

February 17, 2012 by Susan

Life with a newborn has been challenging, to say the least. I barely have time to eat anything, let alone actually cook.  It has become essential that I have some type of bread/loaf such as this one on hand everyday so I can just slice a piece and eat it with one hand.  If not I would wither away to nothing, running on fumes.

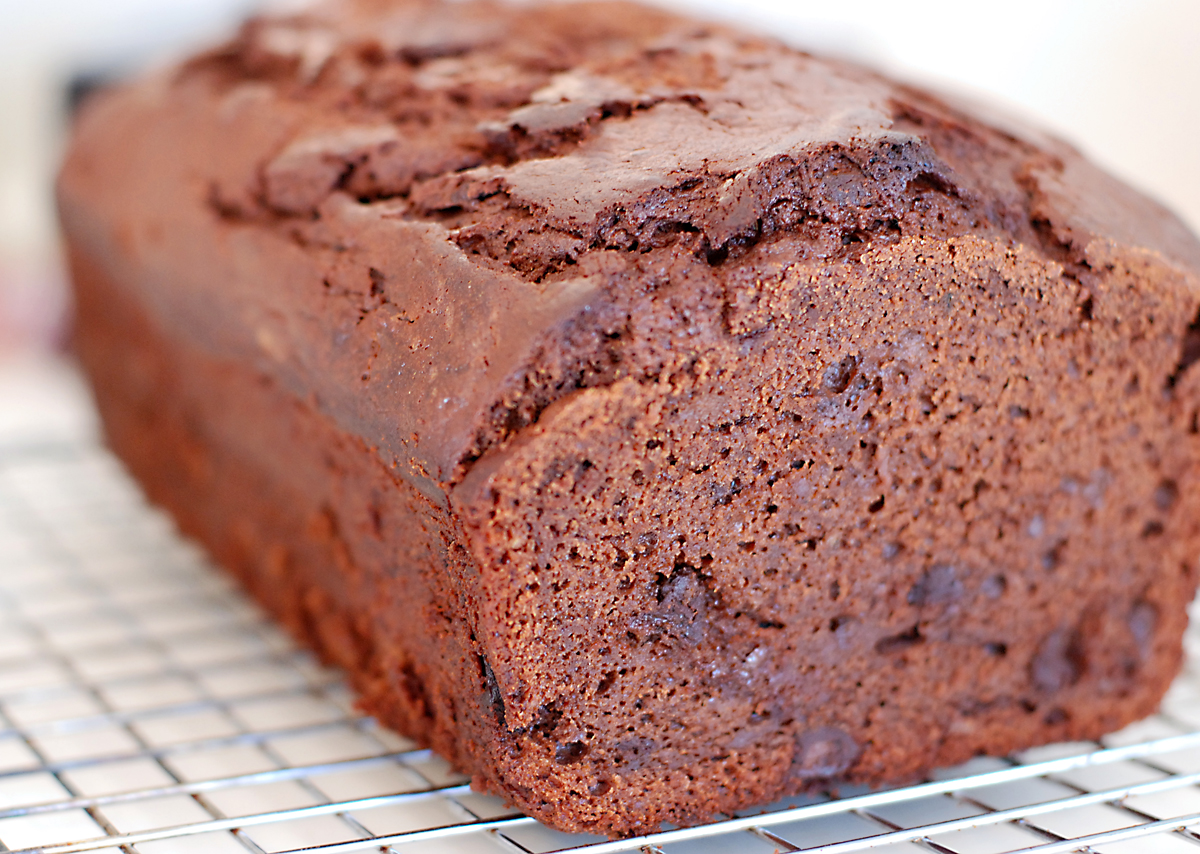
I wanted something a bit different and this loaf fit the bill. Also, it had alot of chocolate in it, something I have grown frighteningly dependent upon lately.  Did I love this bread?  Not exactly.  But I did like it and it actually grew on me…I liked it more and more as the days went on. It is rich and dense yet very moist. And quite filling – like a meal.  And when you don’t have time to eat meals anymore you become thankful for a slice of chocolate banana bread that will fill you up and provide some comfort as well.

Here’s what you will need to make one loaf…

Recipe

2 cups all-purpose flour
1 cup unsweetened cocoa powder
1 1/2 tsp baking powder
1/2 tsp salt
1/4 tsp baking soda
1 stick unsalted butter, room temp
3/4 cup sugar
1/2 cup packed light brown sugar
2 large eggs, room temp
2 ripe bananas, mashed
3/4 cup buttermilk
3 ounces bittersweet chocolate, coarsely chopped
Preheat oven to 350. Butter a 9 x 5 inch loaf pan and place it on an insulated baking sheet or on two regular baking sheets stacked on top of the other. (This extra insulation will keep the bottom of the bread from over baking.)

Method

Sift together the flour, cocoa, baking powder, salt and baking soda.

Working with a stand mixer fitted with a paddle attachment beat the butter at medium speed for about a minute, until softened. Add the sugars and beat for 2 minutes more. Add the eggs one at a time, beating for a minute after each addition. At this point, the batter may look a little curdled — it’s okay. Reduce the mixer speed to low and mix in the mashed bananas. Add the dry ingredients in 3 additions, mixing only until they disappear into the batter. Still on low speed, add the buttermilk, mixing until it is incorporated. Stir in the chopped chocolate. Scrape the batter into the pan.

Bake for 30 minutes. Cover the bread loosely with a foil tent to keep the top from getting too dark, and continue to bake for another 45 to 65 minutes or until a thin knife inserted into the center comes out clean. Transfer the pan to a rack and cool for at least 20 minutes before running a knife around the edges of the bread and unmolding. Invert and cool to room temp right side up.

Cut yourself a nice thick slice and enjoy!

Recipe courtesy Dorie Greenspan

Filed Under: Breakfast, Sweets Tagged With: banana, bread, chocolate, loaf

Chicken Madison

December 14, 2011 by Susan

ChickenMadisonR

A few years ago, while my husband and I were planning our wedding, we went out for dinner near the reception hall we had just chosen for our wedding day.  We both ordered the same chicken entrée because it sounded so delicious.  And it was.  We loved it so much that as I was eating it I thought…I’m going to try to recreate this dish at home.  How hard can it be?

Well, here’s the dish.  And I must say, it’s pretty darn close to the original one we had at the restaurant that night – minus the tons of butter I’m sure they put in it.  It has turned out to be one of our favorite meals.  I named this dish after the town the restaurant is in and every time I make it we are reminded of our wedding and all the planning that went into it.

Hopefully by following this recipe you will have extra sauce leftover once you have eaten all the chicken.  Absolutely do not throw that sauce away.  It is utterly spectacular over pasta.

Here’s what you will need to serve 4….

Recipe

6 thin chicken cutlets (they come butterflied in my store, I usually cut them in 1/2 down the center).

whole wheat flour

4 cloves garlic, smashed

2 garlic cloves, minced

1 box crimini mushrooms, cleaned and sliced (not too thin)

1 12 oz bag of frozen artichoke hearts, slightly defrosted, cut in half lengthwise

1 Tbsp tomato paste

1  7 ounce jar of sun dried tomatoes, drained and sliced, 2-3 tbsp of oil reserved

1/2 – 3/4 cup white wine

3/4 – 1 cup chicken stock, low sodium

1 tsp fresh thyme, chopped

1/3 cup fresh parsley, chopped

Salt & Pepper

Olive oil

1 Tbsp butter, optional

Method

Heat a few tablespoons of olive oil in a large skillet over medium heat.  Add 2 smashed garlic cloves, to season the oil.  Season chicken with salt & pepper and coat in the flour, tapping off excess.  Add some of the chicken to oil, being sure not to overcrowd the pan, cooking them until golden brown on each side.  Remove from skillet and transfer to a plate.  Be careful to watch the cloves of garlic and be sure to remove them once they appear to be getting too golden.  You don’t want them to burn.  Repeat with remaining chicken and smashed garlic.

In the same skillet you just cooked all the chicken in add the oil you reserved from the sun dried tomatoes.  Into that oil add the artichoke hearts and cook, stirring occasionally, for 3-4 minutes.  To the artichokes add the sliced mushrooms and cook for 3-4 minutes, or until they start to soften a bit.  Next, add the tomato paste and garlic and stir into the vegetables, cooking for 2-3 minutes.  At this point I usually add some salt and pepper.  Next comes the liquids…add the wine first, allowing it to simmer for a few minutes.  Finally add the chicken stock and the fresh thyme.  Allow liquids to simmer together for 4-5 minutes.  To thicken this liquid mixture a bit, add approximately 1-2 tablespoons of the leftover whole wheat flour to the skillet, whisking to mix.

Add the chicken cutlets back into the skillet, nestling them all in under the veggies, gently, as best as you can.  Ideally you want most of the chicken to be submerged into the liquid.  It is ok if the tops of a few pieces are not submerged.  If you feel you need a bit more liquid, add some more chicken stock.  Put a cover on the skillet, lower heat to low and gently simmer for 15 – 20 minutes, or until the chicken is cooked through.  Once cooked, turn off heat and add the parsley.  If you so choose, you can also add the butter, just to finish the sauce a bit.  A little tablespoon of butter won’t hurt!

I always serve this over a creamy white bean puree (recipe coming soon!).  However, it would be equally as delicious served over mashed potatoes or white rice.

Chicken Madison
 
Print
Author: Feasts And Fotos
Ingredients
  • 6 thin chicken cutlets (they come butterflied in my store, I usually cut them in ½ down the center).
  • whole wheat flour
  • 4 cloves garlic, smashed
  • 2 garlic cloves, minced
  • 1 box crimini mushrooms, cleaned and sliced (not too thin)
  • 1 12 oz bag of frozen artichoke hearts, slightly defrosted, cut in half lengthwise
  • 1 Tbsp tomato paste
  • 1  7 ounce jar of sun dried tomatoes, drained and sliced, 2-3 tbsp of oil reserved
  • ½ - ¾ cup white wine
  • ¾ - 1 cup chicken stock, low sodium
  • 1 tsp fresh thyme, chopped
  • ⅓ cup fresh parsley, chopped
  • Salt & Pepper
  • Olive oil
  • 1 Tbsp butter, optional
Method
  1. Heat a few tablespoons of olive oil in a large skillet over medium heat.  Add 2 smashed garlic cloves, to season the oil.  Season chicken with salt & pepper and coat in the flour, tapping off excess.  Add some of the chicken to oil, being sure not to overcrowd the pan, cooking them until golden brown on each side.  Remove from skillet and transfer to a plate.  Be careful to watch the cloves of garlic and be sure to remove them once they appear to be getting too golden.  You don't want them to burn.  Repeat with remaining chicken and smashed garlic.
  2. In the same skillet you just cooked all the chicken in add the oil you reserved from the sun dried tomatoes.  Into that oil add the artichoke hearts and cook, stirring occasionally, for 3-4 minutes.  To the artichokes add the sliced mushrooms and cook for 3-4 minutes, or until they start to soften a bit.  Next, add the tomato paste and garlic and stir into the vegetables, cooking for 2-3 minutes.  At this point I usually add some salt and pepper.  Next comes the liquids...add the wine first, allowing it to simmer for a few minutes.  Finally add the chicken stock and the fresh thyme.  Allow liquids to simmer together for 4-5 minutes.  To thicken this liquid mixture a bit, add approximately 1-2 tablespoons of the leftover whole wheat flour to the skillet, whisking to mix.
  3. Add the chicken cutlets back into the skillet, nestling them all in under the veggies, gently, as best as you can.  Ideally you want most of the chicken to be submerged into the liquid.  It is ok if the tops of a few pieces are not submerged.  If you feel you need a bit more liquid, add some more chicken stock.  Put a cover on the skillet, lower heat to low and gently simmer for 15 - 20 minutes, or until the chicken is cooked through.  Once cooked, turn off heat and add the parsley.  If you so choose, you can also add the butter, just to finish the sauce a bit.
3.2.2802

Filed Under: Main Dishes Tagged With: artichoke hearts, chicken, dinner, mushrooms, sun-dried tomatoes

Beef Barley Soup

October 28, 2011 by Susan

BeefBarleySoupRThat winter chill is back in the air.  And that could only mean one thing – soup time!

I love soups, particularly hearty ones and am constantly on the lookout for a new soup to add to my winter-soup-rotation.  This one has made the cut.  It’s a cross between a soup and a stew, actually.  A complete meal in a bowl.  The barley really thickens up the soup.  One time I was a little short on barley so I added in some cooked quinoa that I had leftover in the fridge.  It was wonderful.

I adapted this recipe from Martha Stewart.  I’ve already made it a few times and tweaked it to my liking, adding more meat and mushrooms than originally called for and completely introducing thyme (always goes great with mushrooms) and peas.  I hope you love my version as much as we do!

Here’s what you will need to serve 6…

Recipe

2 tbsp olive oil

2 pounds beef chuck, cut into 3/4 inch cubes

1 large onion, chopped

1 large carrot, chopped

1 package crimini mushrooms, sliced

1 package shiitake mushrooms, sliced

2 tbsp garlic, minced (approx 4 cloves)

1 tsp chopped thyme

2 tbsp tomato paste

3/4 cup dry red wine

4 cups chicken stock, low sodium

2 1/2 cups water

3/4 cup barley

1/2 cup frozen peas

1/4 cup parsley, chopped

salt & pepper

Method

Heat olive oil in a large heavy pot or dutch oven over medium heat.  Season beef cubes with salt & pepper and brown on all sides.  For 2 pounds of meat I usually do this in 2 batches so I don’t overcrowd the pan.  Transfer meat to a plate and set aside.

Reduce heat slightly and add a touch more olive oil if needed.  Add onion and carrots to the pot and cook for 2-3 minutes.  Add the mushrooms, stirring occasionally, and cook until veggies have softened, approximately 10 minutes.

Add garlic, thyme, tomato paste and cook for 3-4 minutes.  Add wine and bring to a boil, scraping up any brown bits on the bottom of the pot.  Cook until reduced by half, 4-5 minutes.

Return beef to the pot.  Add the chicken stock and water.  Bring to a boil, reduce heat to low and simmer, covered for 1 hour, stirring occasionally.

After 1 hour add the barley to the pot and continue to cook, covered, for 30 – 40 minutes, or until barley is tender.  Add frozen peas for the last 2-3 minutes of cooking.  Turn off heat, stir in parsley and serve.

Beef Barley Soup
 
Print
Author: Feasts And Fotos
Ingredients
  • 2 tbsp olive oil
  • 2 pounds beef chuck, cut into ¾ inch cubes
  • 1 large onion, chopped
  • 1 large carrot, chopped
  • 1 package crimini mushrooms, sliced
  • 1 package shiitake mushrooms, sliced
  • 2 tbsp garlic, minced (approx 4 cloves)
  • 1 tsp chopped thyme
  • 2 tbsp tomato paste
  • ¾ cup dry red wine
  • 4 cups chicken stock, low sodium
  • 2½ cups water
  • ¾ cup barley
  • ½ cup frozen peas
  • ¼ cup parsley, chopped
  • salt & pepper
Method
  1. Heat olive oil in a large heavy pot or dutch oven over medium heat.  Season beef cubes with salt & pepper and brown on all sides.  For 2 pounds of meat I usually do this in 2 batches so I don't overcrowd the pan.  Transfer meat to a plate and set aside.
  2. Reduce heat slightly and add a touch more olive oil if needed.  Add onion and carrots to the pot and cook for 2-3 minutes.  Add the mushrooms, stirring occasionally, and cook until veggies have softened, approximately 10 minutes.
  3. Add garlic, thyme, tomato paste and cook for 3-4 minutes.  Add wine and bring to a boil, scraping up any brown bits on the bottom of the pot.  Cook until reduced by half, 4-5 minutes.
  4. Return beef to the pot.  Add the chicken stock and water.  Bring to a boil, reduce heat to low and simmer, covered for 1 hour, stirring occasionally.
  5. After 1 hour add the barley to the pot and continue to cook, covered, for 30 - 40 minutes, or until barley is tender.  Add frozen peas for the last 2-3 minutes of cooking.  Turn off heat, stir in parsley and serve.
3.2.2802

Filed Under: Soup Tagged With: barley, beef, comfort food, dinner, soup, stew

Quinoa with Chicken and Zucchini

September 28, 2011 by Susan


A few years back I posted a recipe for chicken and vegetable couscous.  After making the dish a few times I substituted the couscous with quinoa and have been making it that way ever since.  Quinoa is a super food, afterall, so I try to incorporate it whenever I can.  And it’s just so easy to cook!

Over the past few months I have made one more adjustment, substituting the olives with mushrooms.  I just can’t seem to stomach olives during this pregnancy.  And you know what – the dish is just as great!  I give this quinoa dish to my husband for lunch alot and he loves mushrooms, so I’ve gotten zero complaints from him.  It is quick to make and hearty to eat, an all around winner.

Here’s what you will need to serve 4…
2 tbsp olive oil

2 large thin, boneless chicken breasts, cubed

1 large onion

2 zucchini, cubed or cut into 1/2 moons

2 cloves garlic, minced

2 tsp grated lemon zest

Juice of one lemon

1/2 tsp crushed red pepper

1-2 pinches of cinnamon

8-10 crimini mushrooms, sliced (not too thin)

1 1/2 cup quinoa

3 cups chicken stock, low sodium

1/4 cup parsley, finely chopped

1/4 cup mint leaves, finely chopped

Salt & pepper
Add quinoa and chicken stock in a pot, bring to a boil, reduce to simmer and cook for approximately 15 minutes.  Fluff with a fork.

Meanwhile, heat olive oil in a large skillet.   Add the chicken cubes and cook until lightly browned on both sides, 3-5 minutes.  Push the chicken to one side of the pan and add the onion, zucchini and mushrooms.  Cook for 4-5 minutes.  Add the garlic, lemon zest, red pepper and cinnamon.  Season with salt & pepper.  Cook for 3 more minutes.

Add the cooked quinoa to the chicken mixture and stir to combine.  Turn off heat and add the parsley, mint and lemon juice.  Mix well.
Recipe originally adapted from Rachael Ray

Filed Under: Rice and Grains Tagged With: chicken, dinner, gluten free, healthy, lunch, mushrooms, Quinoa, zucchini

Spaghetti with Roasted Tomatoes

August 24, 2011 by Susan

My relationship with pasta during this pregnancy has taken on a whole new dimension.  I can’t seem to live without it.  Pasta is on my mind.  Very often.

The more I eat pasta the more I realize that it really is the perfect food.  First and foremost, it is usually very easy to prepare.  And when you are starving (20 times a day) and exhausted (all day long) you want the pasta and you want it quick.  Also, it is satisfying, comforting and filling.  Love.

This little gem is my new favorite pasta that I would be thrilled to eat practically every single day.  It is light and so delicious – perfect for a summer evening.

Here’s what you will need to serve 2-3 hungry (pregnant) people…


Recipe 

1 pound spaghetti

pasta water (do not drain the pasta)

3 packages of cherry tomatoes (approximately 25-30 tomatoes)

1/3 cup italian bread crumbs

4-5 garlic cloves, 1/2 minced, 1/2 sliced

1 tsp red pepper flakes  (more if you like a little kick)

1/2 cup dry white wine

1 tbsp butter (optional)

4 tbsp olive oil

basil leaves (1/2 a bunch)

parmigiano reggiano cheese

salt & pepper


Method

Preheat the oven to 325 degrees. 

Half the cherry tomatoes and place in a large bowl.  Add salt, pepper, breadcrumbs and 2 tbsp of olive oil.  Place on a large baking sheet (either spray with cooking spray or use parchment paper) in a single layer and bake for 60 minutes.

In a large skillet heat 2 tbsp olive oil and butter over low heat.  Add the garlic and red pepper flakes and cook for 1 minute.  Add white wine and simmer for 3-4 minutes.  Add 6-8 large, whole basil leaves.  Turn off heat.

When tomatoes are 3/4 done, remove about 15 tomato halves from the oven and add them to the wine mixture.  Smash them gently with the back of the spoon.  Turn the heat back on and cook the tomatoes in the wine mixture for a few minutes.  When the rest of the tomatoes are done add them to the skillet.

When the spaghetti is almost fully cooked (still al dente) add to the skillet.  I use thongs for this.  It is perfectly fine to bring along whatever pasta water is on the noodles.  Also add 3 ladles of the pasta water to the pasta and wine mixture.  Stir to combine over low heat for 1-2 minutes.  Turn off the heat, add a few fistfuls of cheese to the pasta as well as a ton of torn basil leaves.

Recipe inspired by Lidia Bastianich

Spaghetti with Roasted Tomatoes
 
Print
Author: Feasts And Fotos
Ingredients
  • 1 pound spaghetti
  • pasta water (do not drain the pasta)
  • 3 packages of cherry tomatoes (approximately 25-30 tomatoes)
  • ⅓ cup italian bread crumbs
  • 4-5 garlic cloves, ½ minced, ½ sliced
  • 1 tsp red pepper flakes  (more if you like a little kick)
  • ½ cup dry white wine
  • 1 tbsp butter (optional)
  • 4 tbsp olive oil
  • basil leaves (1/2 a bunch)
  • parmigiano reggiano cheese
  • salt & pepper
Method
  1. Preheat the oven to 325 degrees.
  2. Half the cherry tomatoes and place in a large bowl.  Add salt, pepper, breadcrumbs and 2 tbsp of olive oil.  Place on a large baking sheet (either spray with cooking spray or use parchment paper) in a single layer and bake for 60 minutes.
  3. In a large skillet heat 2 tbsp olive oil and butter over low heat.  Add the garlic and red pepper flakes and cook for 1 minute.  Add white wine and simmer for 3-4 minutes.  Add 6-8 large, whole basil leaves.  Turn off heat.
  4. When tomatoes are ¾ done, remove about 15 tomato halves from the oven and add them to the wine mixture.  Smash them gently with the back of the spoon.  Turn the heat back on and cook the tomatoes in the wine mixture for a few minutes.  When the rest of the tomatoes are done add them to the skillet.
  5. When the spaghetti is almost fully cooked (still al dente) add to the skillet.  I use thongs for this.  It is perfectly fine to bring along whatever pasta water is on the noodles.  Also add 3 ladles of the pasta water to the pasta and wine mixture.  Stir to combine over low heat for 1-2 minutes.  Turn off the heat, add a few fistfuls of cheese to the pasta as well as a ton of torn basil leaves.
3.2.2802

Filed Under: Pasta Tagged With: basil, pasta, roasted, spaghetti, tomatoes

Curry Yogurt Chicken

July 29, 2011 by Susan


Every time I make this dish the two of us can’t stop exclaiming how much we love it.  I now try to make it once a week, regardless of what season it is or what the temperature is outside.  Hot out?  Don’t care, still going to make it.  We love it that much.

As my husband was quick to point out to me, this dish has just about everything anyone could want in a meal.  The chicken and rice help to fill you up, the curry, ginger and chili give it just the right amount of tingle (be sure to de-seed the chili pepper if you don’t want the fire!) and the yogurt gives the sauce just the right amount of velvety goodness.  Yet, it’s not too heavy.

Another thing I love about this meal…you can eat it in a bowl sitting in front of the TV.  Casual and comforting.  And the leftovers – amazing.

Here’s what you will need to serve 4-5 people…

Recipe

1/4 cup canola oil

2 pounds thin chicken cutlets, cubed

whole wheat flour, for dusting

2 tbsp finely chopped fresh ginger

1.5 tbsp curry powder

1 large garlic clove, minced

1 red chili pepper, sliced thin (seeds and ribs removed if you don’t want it spicy)

1 large red bell pepper, cored, seeded and cut into large dice

6-7 large vine ripened tomatoes, cut into large chunks

1/2 cup frozen corn kernels

1/3 cup frozen peas

7 oz container Greek yogurt, plain

1/2 – 2/3 cup water

1/3 cup chopped cilantro leaves, for garnish

salt & pepper

basmati rice

Method

In a large, deep skillet heat the oil.   Season the chicken cubes with salt and pepper then dust lightly with flour, coating all sides.  Tap off the excess flour and add chicken to hot oil in batches (don’t overload the skillet).  Cook chicken until lightly browned.  Transfer chicken to a plate.

In the same skillet add the ginger, red pepper, chile pepper and garlic and cook, stirring occasionally, until peppers are slightly softened, about 2 minutes.  Add the curry powder and cook for one minute longer.  Add the chopped tomatoes, corn, peas and water.  Bring to a soft boil.  Next add most of the yogurt.  Stir until smooth.

Add the chicken and any juices to the skillet.  Bring to a boil, reduce heat to low, cover and simmer for approximately 20 – 25 minutes stirring occasionally.  Turn off heat, add the remaining yogurt, stir until smooth and sprinkle with cilantro.  Serve over basmati rice.

Recipe adapted from Food & Wine Magazine

Curry Yogurt Chicken
 
Print
Author: Feasts And Fotos
Ingredients
  • ¼ cup canola oil
  • 2 pounds thin chicken cutlets, cubed
  • whole wheat flour, for dusting
  • 2 tbsp finely chopped fresh ginger
  • 1.5 tbsp curry powder
  • 1 large garlic clove, minced
  • 1 red chili pepper, sliced thin (seeds and ribs removed if you don't want it spicy)
  • 1 large red bell pepper, cored, seeded and cut into large dice
  • 6-7 large vine ripened tomatoes, cut into large chunks
  • ½ cup frozen corn kernels
  • ⅓ cup frozen peas
  • 7 oz container Greek yogurt, plain
  • ½ - ⅔ cup water
  • ⅓ cup chopped cilantro leaves, for garnish
  • salt & pepper
  • basmati rice
Method
  1. In a large, deep skillet heat the oil.   Season the chicken cubes with salt and pepper then dust lightly with flour, coating all sides.  Tap off the excess flour and add chicken to hot oil in batches (don't overload the skillet).  Cook chicken until lightly browned.  Transfer chicken to a plate.
  2. In the same skillet add the ginger, red pepper, chile pepper and garlic and cook, stirring occasionally, until peppers are slightly softened, about 2 minutes.  Add the curry powder and cook for one minute longer.  Add the chopped tomatoes, corn, peas and water.  Bring to a soft boil.  Next add most of the yogurt.  Stir until smooth.
  3. Add the chicken and any juices to the skillet.  Bring to a boil, reduce heat to low, cover and simmer for approximately 20 - 25 minutes stirring occasionally.  Turn off heat, add the remaining yogurt, stir until smooth and sprinkle with cilantro.  Serve over basmati rice.
3.2.2802

Filed Under: Main Dishes Tagged With: chicken, curry, dinner, lunch, yogurt

  • « Previous Page
  • 1
  • 2
  • 3
  • 4
  • 5
  • …
  • 10
  • Next Page »
Hello and welcome to Feasts and Fotos!

Archives

Categories

Copyright © 2025 · Foodie Pro Theme by Shay Bocks · Built on the Genesis Framework · Powered by WordPress